SPECIFICATIONS
Accessories Type: Controller Adapter
Brand Name: NONE
Choice: yes
Compatible Brand/Model: PC
Electric: Yes
High-concerned chemical: None
Model Number: 6th Fuser
Origin: Mainland China
With USB: NO
is_customized: NO
semi_Choice: yes
The DICHEN Fusion 240Hz 6th Generation(THE LATEST VISION: BLUE COLOR)supports fusion and switching, with a maximum resolution of 3840x2160P at 60Hz. It is backward compatible with 2560x1440P at 144Hz, 1920x1080P at 240Hz, 3440x1440P at 100Hz, and 2560x1080P at 200Hz, among others.
Install instructions
* Support various resolutions
* No need for complex settings and adjustments,plug and play!
* Lower latency than streaming and no lags
* Cooperate with DMA to assist in achieving perspective without losing the frame.
* Shipped from the original factory with warranty card
1K 240Hz/2K 144Hz DMA Video Overlay Box HDMI DMA Supreme Version Video Processor High Quality Computer Components.
Interfaces: (Please follow the instructions to connect the HDMI cable in order)
- HDMI output: to connect the main display
- HDMI1 host: to connect the host GPU
- HDMI2 secondary: to connect the secondary machine GPU
- Type-C: to upgrade program and inject EDID (only used during upgrades)
- DC 12V: power supply (default 12V 2A)
- Note: the host GPU cannot be directly connected to the main monitor with a DP or HDMI cable. If there is a connection, it must be unplugged.
Indicators:
- D1: Power indicator (always on for power on)
- D2: Fusion function on/off indicator light
- H2: HDMI2 secondary machine input signal indicator (always on: normal; off: no signal)
- H1: HDMI1 host input signal indicator (always on: normal; off: no signal)
Button Function:
- Power: power switch
- K1: short press for switching resolution in cycle (1920 x 1080; 2560 x 1440; 3840 x 2460; 2560 x 1080; 3440 x 1440)
- Note: long press and hold the K1 key for 3 seconds (hold until displayed): the current resolution and refresh rate are displayed in the upper left corner of the screen, with the host information on the top and the secondary information on the bottom.
- K2: short press for switching the upper layer image matting intensity with a total of 21 levels from 0 to 20. (default 0, level 0 also matting)
- K3: short press to restore the upper layer cutout strength to the factory default of 0.
- K4: Short press for switching the fusion function.
- Note: If you press the K4 key and the fusion light on, but there are no perspective fusion, there are two ways to solve this problem. One is to set the background color of the secondary unit to pure black; The second is to press the K2 key to enhance the RGB value.

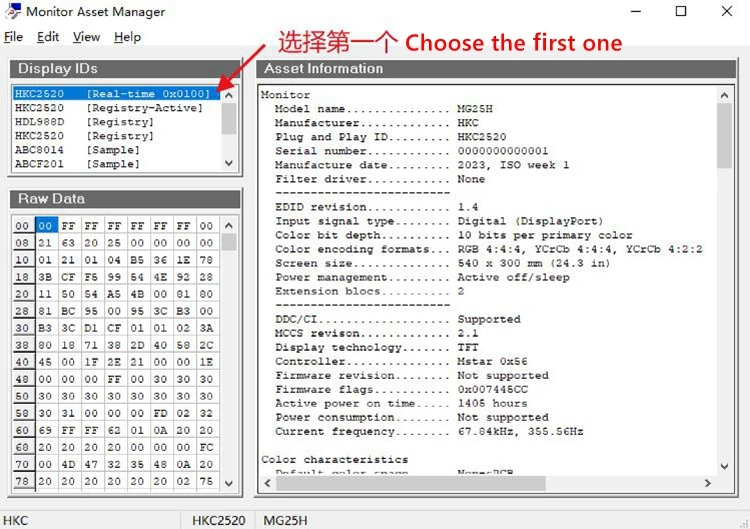
After opening, select the first one:
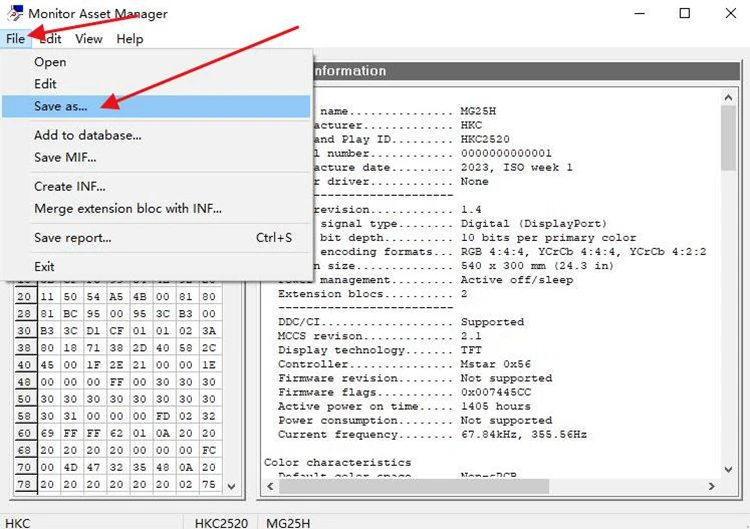
Select File, click Save as...:
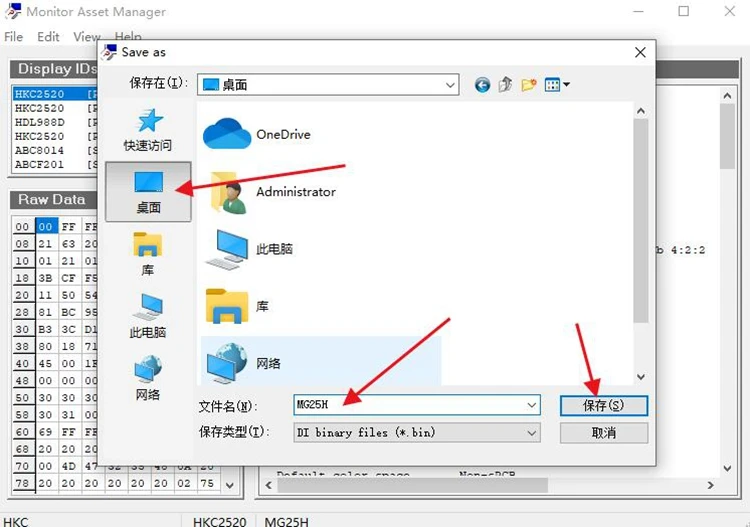
Choose the saving path, click SAVE to read the EDI Bin file:
Second Step: inject EDID to the DMA video overlay box
After saving the Bin file, insert the Type-C cable into the Type-C port of the DMA video overlay box, and connect the other end of the USB to the computer where the Bin file was just saved. (At this point, restore the normal wiring of the DMA video overlay box, that is, connect the HDMIoutput cable of the computer host GPU to the box, and connect the box output cable to the main monitor.) Power it on, and then turn on the box.
Next, open the [Injector tool]:
Attention: This product is not open source. Please do not refresh the firmware yourself and do not inject any files into the blue box area.
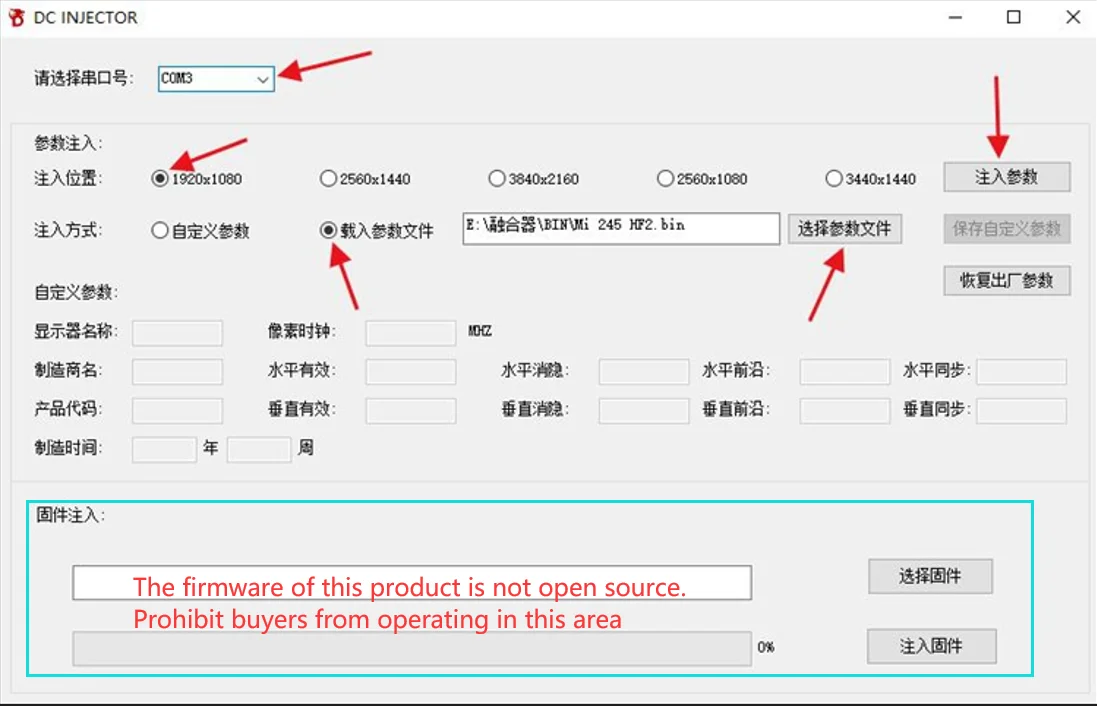 After opening, select the serial port number (if the serial port number is not correct, it will point out fail), select the correct injection location in the parameter injection (according to the resolution of the main monitor, which is the resolution set above, it is very important to choose the correct resolution), select the injection method as [Load Parameter File], select the parameter file (the saved Bin file read before), and finally click [Injection Parameters] to wait for injection. During the injection process, a black screen will appear for a while, and after completion, there will be a prompt indicating successful injection. After successful injection, unplug the Type-C cable and keep the output of the box connected to the HDMicable to the main display.
Precaution:
- Using the previously set refresh rate for the host and secondary computers, right-click on the desktop to open 'Display Settings', check if the resolution is correct, drag to the bottom to open 'Advanced Display Settings', select the monitor (the model is the one you just injected), and set the refresh rate below to the optimal refresh rate for your monitor.
Package Included:
- 1 x Host